What is a Service in Kubernetes?
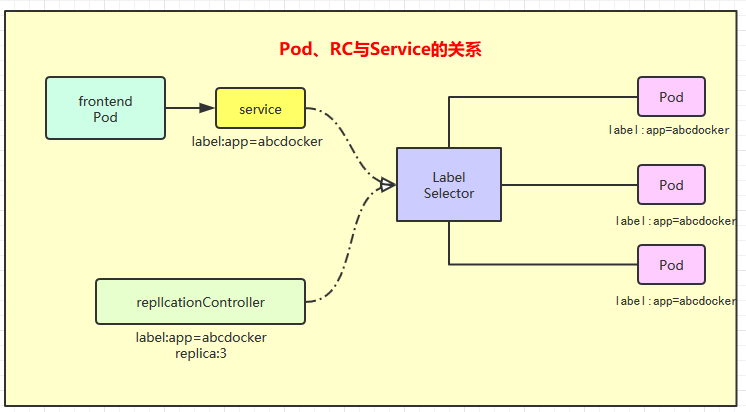
Service is one of the core resource objects in Kubernetes. It defines an entry point for accessing a service. The frontend application (Pod) accesses a cluster of backend Pod replicas through this entry point. The seamless connection between Service and its backend Pod replica cluster is achieved through Label Selector. The role of ReplicationController (RC) is to ensure that the service capability and quality of Service are maintained at the expected standard.
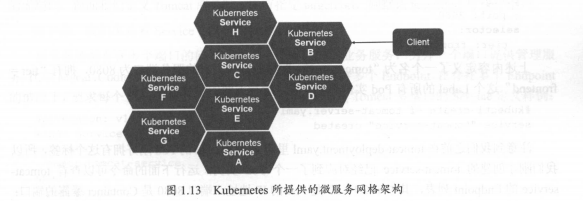
Microservices Network Architecture provided by Kubernetes
By analyzing, identifying, and modeling all services in the system as microservices – Kubernetes Service, our system is ultimately composed of multiple independent microservice units that provide different business capabilities. These services communicate via TCP/IP, thus possessing strong distributed capabilities, elastic scalability, and fault tolerance.
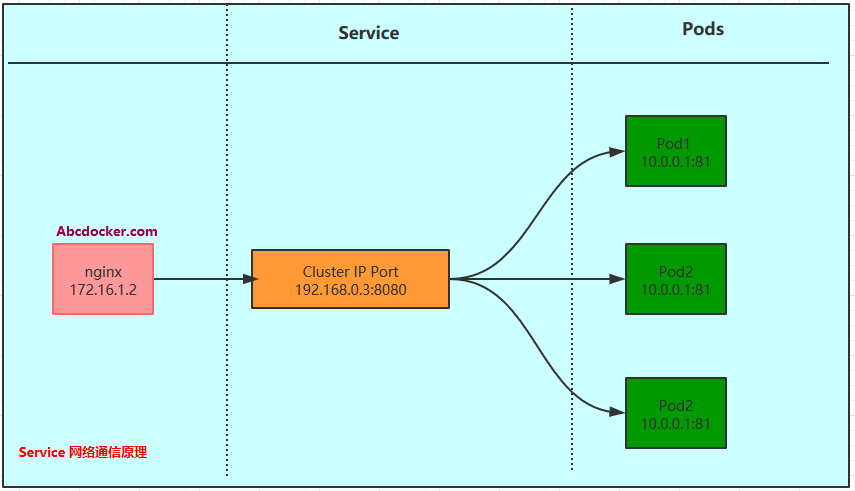
Since each Pod is assigned a separate IP address and each Pod provides an independent Endpoint (Pod IP + ContainerPort) for client access, multiple Pod replicas now form a cluster to provide access.
Kubernetes requires the installation of kube-proxy on each Node. The kube-proxy process is essentially an intelligent software load balancer responsible for forwarding requests to a backend Pod instance for the Service and implementing service load balancing and session persistence mechanisms internally.
Kubernetes has ingeniously designed Services to not share a single load balancer’s IP address. Instead, each Service is allocated a globally unique virtual IP address, known as Cluster IP. This way, each service becomes a “communication node” with a unique IP address, simplifying service invocation to basic TCP network communication problems.
While Pod Endpoint addresses change with Pod destruction and recreation, as the new Pod address differs from the old Pod, once a Service is created, Kubernetes automatically assigns it an available Cluster IP. Furthermore, throughout the Service’s lifecycle, its Cluster IP remains unchanged. Therefore, mapping the Service’s name to the Service’s Cluster IP address resolves the issue.
Creating a Service Example: Manually creating a Service
kind: Service
apiVersion: v1
metadata:
  name: mallh5-service
  namespace: abcdocker
spec:
  selector:
    app: mallh5web
  type: NodePort
  ports:
    - protocol: TCP      # Only TCP and UDP are supported; defaults to TCP if not specified
      port: 3017
      targetPort: 5003
      nodePort: 31122
Parameters Explanation:
- Port: Port represents the port exposed on the cluster IP (Service IP). “:port” is provided for internal cluster client access to the service.
- NodePort: NodePort is a way for external clients to access the service entry point provided by Kubernetes to cluster clients (another way is LoadBalancer). “:nodePort” is provided for external clients to access the service.
- targetPort: TargetPort is easy to understand; it is the port on the Pod. Data arriving from port and nodePort ultimately flows through kube-proxy to the targetPort on the backend Pod and enters the container.
Creation:
[root@master test]# kubectl create -f abcdocker-server.yaml
service/mallh5-service created
Viewing detailed server information:
[root@master test]# kubectl get service --namespace=abcdocker
NAME             TYPE       CLUSTER-IP      EXTERNAL-IP   PORT(S)          AGE
mallh5-service   NodePort   10.254.22.153   <none>        3017:31122/TCP   13m
[root@master test]# kubectl get service
NAME            TYPE        CLUSTER-IP       EXTERNAL-IP   PORT(S)        AGE
kubernetes      ClusterIP   10.254.0.1       <none>        443/TCP        35d
nginx-service   NodePort    10.254.200.178   <none>        80:31000/TCP   34d
You can check the network via kubectl get endpoints.
Service Details:
[root@abcdockeryaml]# kubectl describe svc myserver
Name:              myserver     # Name
Namespace:         default      # Namespace
Labels:            <none>
Annotations:       <none>
Selector:          app=nginx    # Matches Pod labels
Type:              ClusterIP    # svc ip type
IP:                10.254.219.137   # svc IP address
Port:              mynginx-http  80/TCP   # svc port (can be adjusted according to business)
TargetPort:        80/TCP       # pod port
Endpoints:         172.30.144.2:80  # Matching pod IP
Session Affinity:  None
Events:            <none>
Tips: targetPort supports strings. Scenario: If there are 2 pods with labels both set as nginx, but our business logic matches one of them, we can add a name variable under containerPort in one of the pods, and then directly write the targetPort into the variable when referenced by svc.
Deployment file:
---
apiVersion: v1
kind
: ReplicationController
metadata:
name: rc-demo
labels:
app: rc-demo
spec:
replicas: 1
template:
metadata:
labels:
app: nginx
spec:
containers:
- name: nginx-demo
image: nginx
resources:
requests:
cpu: 100m
ports:
- containerPort: 80
name: nginxweb
# Add a name to the ports container port; it can be directly used in svc
svc yaml:
apiVersion: v1
kind: Service
metadata:
  name: myserver
  namespace: default
spec:
  selector:
    app: nginx
  ports:
    - name: mynginx-http
      protocol: TCP
      port: 80
      targetPort: nginxweb
# targetPort is referenced directly
Describing the result:
[root@abcdocker yaml]# kubectl describe svc myserver
Name:              myserver
Namespace:         default
Labels:            <none>
Annotations:       kubectl.kubernetes.io/last-applied-configuration:
                     {"apiVersion":"v1","kind":"Service","metadata":{"annotations":{},"name":"myserver","namespace":"default"},"spec":{"ports":[{"name":"myngin...
Selector:          app=nginx
Type:              ClusterIP
IP:                10.254.219.137
Port:              mynginx-http  80/TCP
TargetPort:        nginxweb/TCP
Endpoints:         <none>
Session Affinity:  None
Events:            <none>
Issues with External System Accessing Service:
We need to understand three types of IPs in Kubernetes:
- Node IP: IP address of each node in the Kubernetes cluster
- Pod IP: IP address of each Pod
- Cluster IP: IP address of the Service
Parameter Explanation:
- Node IP: The Node IP is the IP address of each node’s physical network card in the Kubernetes cluster. It is a real physical network, and all servers belonging to this network can communicate directly through this network, regardless of whether there are nodes outside the Kubernetes cluster. When nodes outside Kubernetes need to access nodes inside Kubernetes or TCP/IP services, they must use the Node IP.
Access diagram for server:
- Pod IP: The Pod IP is the IP address of each Pod. It is allocated by the Docker Engine based on the IP address range of the docker0 bridge. It is usually a virtual layer 2 network. Kubernetes requires Pods on different Nodes to communicate directly with each other, so when a Pod’s container accesses another Pod’s container within Kubernetes, communication occurs through the virtual layer 2 network where the Pod IP is located, while the actual TCP/IP traffic flows through the physical network card where the Node IP is located.
- Cluster IP: It is a virtual IP but more like a spoofed IP network.
- Cluster IP only acts on Kubernetes Service objects and is managed and allocated by Kubernetes (from the Cluster IP address pool).
- Cluster IP cannot be pinged because there is no “physical network object” to respond.
- In communication between Node IP, Pod IP, and Cluster IP within the Kubernetes cluster, Kubernetes uses its own special routing rules.
Brief Description of NodePort Implementation:
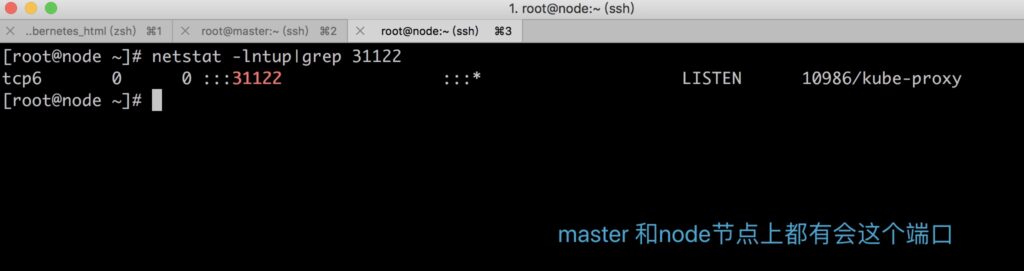
The implementation of NodePort is to open a corresponding TCP request for the Service that needs external access on each Node in the Kubernetes cluster. External systems only need to use any Node’s IP address + specific NodePort port to access the service. By running the netstat service on any node, we can see that the NodePort port is being listened on.
However, NodePort has not completely solved all the problems of external access to the Service, such as the load balancing problem. For example, if there are 10 nodes in the cluster, it is best to have a load balancer.
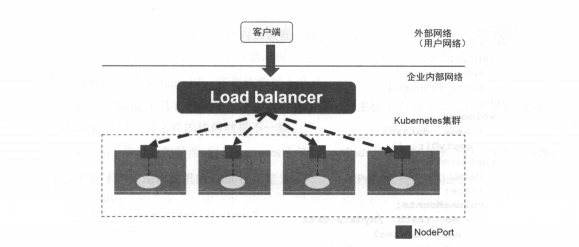
External requests only need to access the IP address of this load balancer, which is responsible for forwarding traffic to the backend NodePort on one of the nodes.
Example:
---
apiVersion: v1
kind: Service
metadata:
  name: myserver
  namespace: default
spec:
  selector:
    app: nginx
  type: NodePort
  ports:
    - name: mynginx-http
      protocol: TCP
      port: 80
      targetPort: 80
      nodePort: 30001       # If we don't specify a nodePort port, a random port between 30000 and 32767 will be generated
After creation, view svc:
[root@abcdocker yaml]# kubectl get svc
NAME         TYPE        CLUSTER-IP       EXTERNAL-IP   PORT(S)        AGE
kubernetes   ClusterIP   10.254.0.1       <none>        443/TCP        83d
myserver     NodePort    10.254.201.121   <none>        80:30001/TCP   5s
Describe the svc:
[root@abcdocker yaml]# kubectl describe svc myserver
Name:                     myserver
Namespace:                default
Labels:                   <none>
Annotations:              kubectl.kubernetes.io/last-applied-configuration:
                            {"apiVersion":"v1","kind":"Service","metadata":{"annotations":{},"name":"myserver","namespace":"default"},"spec":{"ports":[{"name":"myngin...
Selector:                 app=nginx
Type:                     NodePort
IP:                       10.254.201.121
Port:                     mynginx-http  80/TCP
TargetPort:               80/TCP
NodePort:                 mynginx-http  30001/TCP
Endpoints:                172.30.144.2:80
Session Affinity:         None
External Traffic Policy:  Cluster
Events:                   <none>
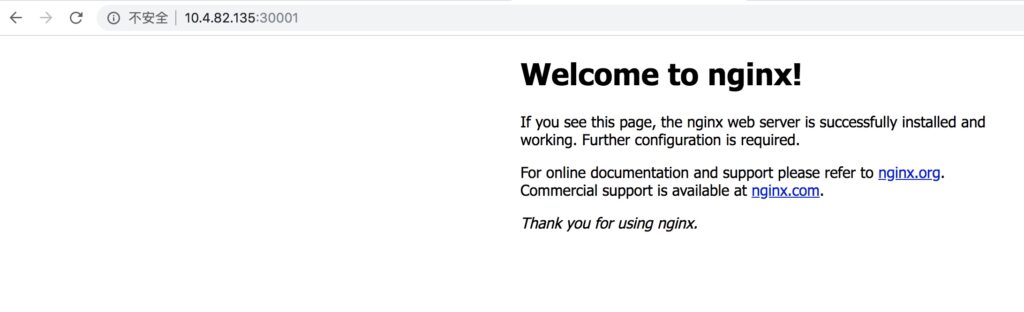
Now you can access it using a browser.
We can see that svc access is actually generated through kube-proxy. Now let’s take a look at how kube-proxy works.
[root@abcdocker yaml]# netstat -lntup|grep 30001
tcp6       0      0 :::30001                :::*                    LISTEN      933/kube-proxy
How Kube-proxy Works:
- In many cases, Service is just a concept. The actual Service role is played by the kube-proxy service process.
- A kube-proxy service process runs on each Node node.
- For each TCP-type Kubernetes Service, kube-proxy will establish a SocketServer on the local Node node to handle incoming requests and evenly send them to the port of a backend Pod. This process defaults to using the Round Robin (rr) load balancing algorithm.
- kube-proxy creates a “service proxy object” for each Service by querying and listening to changes in Service and Endpoints in the API Server, and synchronizes them automatically. The service proxy object is a kind of architecture within the kube-proxy program. It includes a SocketServer for listening to requests for this service. The port of the SocketServer is randomly selected
from the local available ports. In addition, kube-proxy internally creates a load balancer LoadBalancer.
- For the list of Services that have changed, kube-proxy will process them one by one.
If no cluster IP is set, no action is taken. Otherwise, take all port definition lists for the Service:
- Assign a service proxy object for the Service port and create related iptables rules for the Service.
- Update the forwarding address list corresponding to the Service in the load balancer component.
kube-proxy adds four rules chains to the NAT table in the local iptables when started and when changes in Service or Endpoint are detected:
- KUBE-PORTABLS-CONTAINER: Access service from a container through Cluster IP and port number.
- KUBE-PORTALS-HOST: Access service from the host through Cluster IP and port number.
- KUBE-NODEPORT-CONTAINER: Access service from a container through NODE IP and port number.
- KUBE-NODEPORT-HOST: Access service from the host through Node IP and port number.
Note: We can also set a default policy for kube-proxy to randomly select a pod. We can also implement session affinity based on the client IP by setting the value of service.spec.sessionAffinity to “ClientIP” (the default value is “None”).